Sharp ache alongside the internal aspect of your ankle.
A uninteresting ache that creeps up your shin after a couple of miles.
Tenderness while you push on the tendon slightly below that bony bump on the within of your ankle.
If any of that sounds acquainted, you might have posterior tibial tendon dysfunction, one of the crucial underestimated accidents in operating.
Most runners attempt to run by way of it. That’s the improper name.
That is the one damage the place pushing by way of can completely change the form of your foot.
The excellent news: catch it early and observe a structured protocol, and full restoration is completely potential with out surgical procedure.
On this information, you’ll be taught:
- Precisely what the posterior tibial tendon does and why it fails in runners
- Tips on how to self-diagnose utilizing a easy at-home check
- Why this damage progresses in phases, and what every stage means on your therapy choices
- The 4-component therapy framework backed by scientific analysis
- Every week-by-week rehab train development you possibly can observe at dwelling
- When it’s secure to start out operating once more
RunnersConnect Bonus
Obtain our Posterior Tibial Harm Define without spending a dime.
It’s a PDF with the conservative and aggressive therapy choices for runners affected by posterior tibial tendon ache.
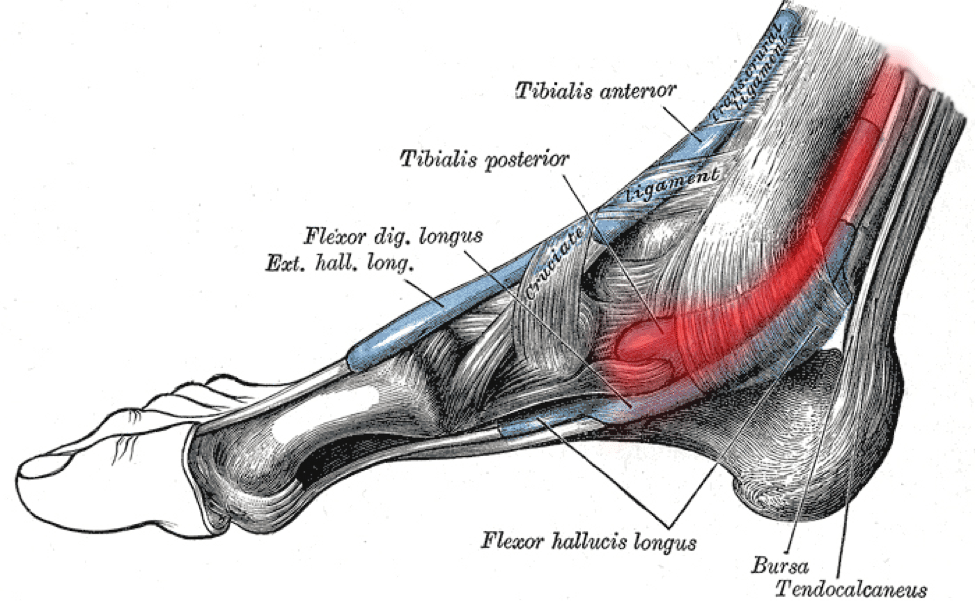
What Is the Posterior Tibial Tendon?
The posterior tibial tendon runs up the within of your ankle, connecting the tibialis posterior muscle (buried deep in your calf) to the bones within the arch of your foot.
The tendon itself is not any thicker than a pencil. However its job is big.
Each time your foot hits the bottom and pushes off, the posterior tibial tendon locks your ankle in place and maintains your arch in a inflexible, secure place.
With out it, your arch collapses beneath load, your ankle rolls inward, and the remainder of your decrease leg has to compensate.
Consider your foot’s arch as a suspension bridge. The posterior tibial tendon is the primary cable holding rigidity.
If that cable weakens or tears, the bridge sags.
In superior circumstances of posterior tibial tendon dysfunction, the arch collapses completely.
How Do You Know If You Have Posterior Tibial Tendonitis?
The hallmark symptom is ache alongside the within of your ankle and foot, typically extending a couple of inches up your shin.
There could also be delicate swelling, and the realm will often be sore to press straight on the tendon.
Essentially the most dependable self-test is the single-leg heel elevate.
Stand on the affected leg together with your knee straight. Stand up onto the ball of your foot as excessive as you possibly can go, reaching full plantarflexion on the high.
Maintain for a second, then decrease slowly.
Ache or weak point alongside the within of your ankle throughout this check is the clearest indicator of posterior tibial tendon dysfunction.
In additional extreme circumstances, you received’t be capable to rise onto your forefoot in any respect.
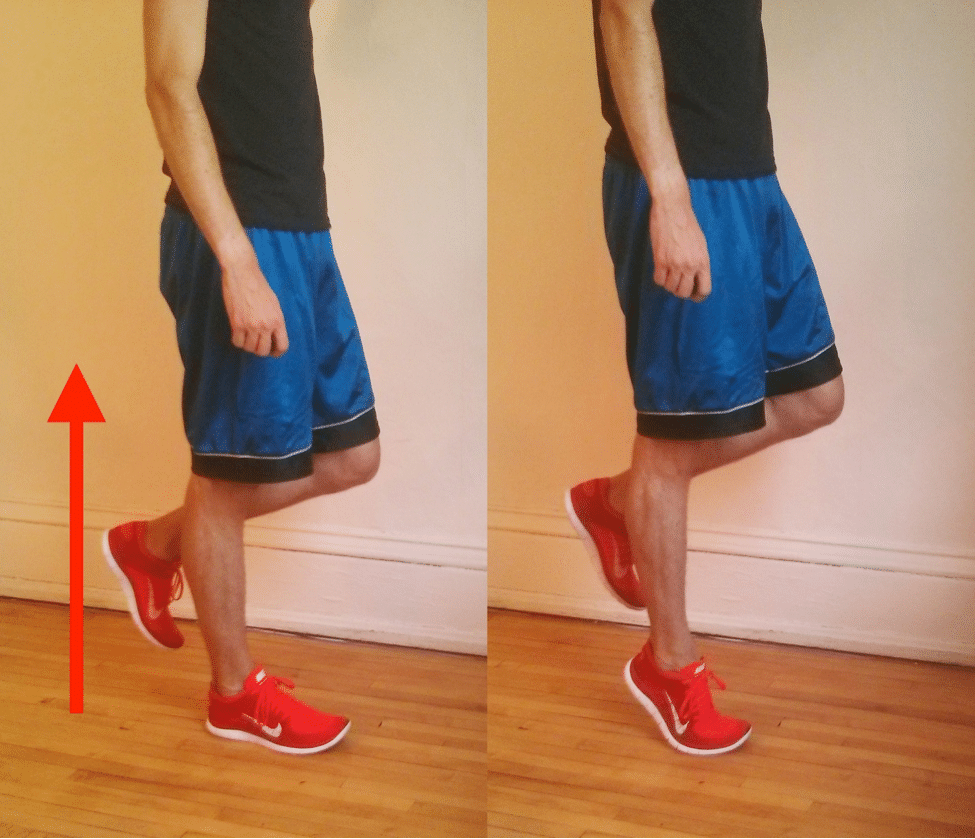
Research have used this check as an inclusion criterion for posterior tibial tendon dysfunction analysis, which tells you ways particular it’s.
It additionally helps rule out comparable accidents. Medial tibial stress syndrome (shin splints) and stress fractures of the medial malleolus may cause ache in the identical area however received’t produce ankle weak point on the heel elevate check.
Why You Can’t Simply Run Via This
In a case-control evaluation of two,002 operating accidents, posterior tibial tendon dysfunction ranked twenty sixth: comparatively unusual.
What makes it harmful is the potential for everlasting development.
Analysis has proven that the posterior tibial tendon has a zone of relative avascularity within the crucial part wrapping across the medial malleolus, which is why it heals much more slowly than most mushy tissue accidents.

Operating on an injured posterior tibial tendon provides harm to a construction that already can’t restore itself quick sufficient.
Because the tendon weakens, your arch drops and your foot pronates extra beneath load. That elevated pronation places extra stress on the posterior tibial tendon.
Extra stress means extra harm. Extra harm means extra pronation.
The cycle repeats till, in extreme circumstances, the arch collapses completely.
The 4 Scientific Phases
Medical doctors classify posterior tibial tendon dysfunction in 4 progressive phases. Figuring out your stage determines your therapy choices.
Stage I: Tendon irritation or microdamage, however no change in foot form. Conservative therapy works nicely.
That is the place you wish to catch it.
Stage II: The tendon begins to elongate and the arch regularly flattens. At this stage, most sufferers can not full a single-leg heel elevate.
Conservative therapy remains to be potential however requires extra intensive administration, usually with specialised ankle-foot orthoses.
Phases III and IV: Partial or full tendon rupture with everlasting foot and ankle deformity. Surgical procedure is often required.
The therapy protocol beneath applies to Stage I. If you’re in Stage II or past, see a podiatrist or foot and ankle orthopedist earlier than beginning any rehab program.
What Causes Posterior Tibial Tendonitis in Runners?
The commonest trigger is basic overuse: ramping mileage too quick, or resuming coaching too shortly after day without work.
Acute tears from a fall or sudden ankle roll are much less frequent however do happen.
Runners with a naturally excessive arch might carry some safety, for the reason that tendon doesn’t must work as laborious to take care of the arch. Runners of each arch kind nonetheless develop this damage, although.
Within the common inhabitants, it’s most typical in chubby, middle-aged ladies. Amongst runners, the sample flips: a 2002 assessment of over 2,000 injured runners discovered it extra frequent in males than ladies.
The sincere reply is that the danger profile for runners particularly isn’t nicely understood.
What Does the Remedy Protocol for Posterior Tibial Tendonitis Look Like?
The analysis on conservative therapy factors constantly to 4 key parts working collectively. No single piece works in isolation.
- Cut back load on the tendon
- Assist the arch with applicable footwear and orthotics
- Stretch the calf complicated
- Progressively strengthen the tendon and surrounding buildings
Under is execute each.
RunnersConnect Bonus
Obtain our free Posterior Tibial Harm Define, a PDF with conservative and aggressive therapy choices, mapped out clearly for runners.
Step 1: How Do You Cut back Load on the Tendon?
Cease operating. Sure, utterly.
The posterior tibial tendon heals slowly due to poor blood provide to the part wrapping round your medial malleolus. Operating provides harm to a construction that may’t restore itself quick sufficient to maintain tempo.
Swimming and biking are usually secure so long as they’re pain-free. Aqua jogging is especially well-suited for this damage (extra on that beneath).
Hold day by day strolling to a minimal as nicely, particularly on uneven surfaces.
The objective throughout this section is giving the tendon sufficient of a break to truly begin therapeutic earlier than you ask it to do rehab work.
Step 2: What Footwear and Orthotics Do You Want?
Each scientific research that has efficiently handled posterior tibial tendon dysfunction with conservative measures used arch assist as a part of the protocol.
The objective is to cut back the mechanical demand on a tendon that may’t presently deal with full load.
Arch assist does this by propping up the arch so the posterior tibial tendon doesn’t must work as laborious with each step.
One research requested sufferers to put on sneakers and orthotics for at the least 90% of their waking hours, together with round the home.
That’s not an exaggeration. Strolling barefoot on laborious flooring nonetheless stresses the tendon.
Put on your sneakers from the second you rise up.

On the query of {custom} vs. over-the-counter: for plantar fasciitis and another foot accidents, inflexible OTC orthotics (like Superfeet or PowerStep) have been proven to work simply in addition to custom-made ones. For posterior tibial tendon dysfunction, that comparability hasn’t been studied.
What the analysis helps is that some arch assist is clearly higher than none.
Whether or not you want {custom} orthotics is a query on your podiatrist or orthopedist. See our full breakdown of the science behind {custom} orthotics for what to anticipate from that dialog.
Step 3: How Ought to You Stretch Your Calves?
Three separate scientific research that efficiently handled posterior tibial tendon dysfunction included a structured calf-stretching protocol.
The usual protocol:
- 3 units x 30 seconds of a wall calf stretch with a straight knee (concentrating on the gastrocnemius)
- 3 units x 30 seconds with a bent knee (concentrating on the soleus)
- Accomplished twice per day, on each legs
- Use an incline board when you have one, because it deepens the stretch
One necessary element from Kulig et al.’s 2009 USC research: do all of your stretching in your sneakers and orthotics.
The assist modifications the mechanics of the stretch in a manner that’s related to tendon loading.
Step 4: What Workout routines Ought to You Do for Posterior Tibial Tendon Rehab?
That is the place the analysis will get particular, and the place most casual recommendation falls quick.
A 2006 paper by Alvarez et al. on the College of Tennessee laid out an in depth 16-week conservative rehab program for Stage I posterior tibial tendon dysfunction.
A 2009 research by Kulig et al. at USC added a focused eccentric loading part.
The protocol has 2 phases. Don’t leap to Section 2 till you’ve accomplished at the least 3 weeks of Section 1.
Section 1: Construct Endurance (Weeks 1-3)
All workout routines are carried out in sneakers and orthotics. Cease if you happen to really feel vital ache.
Working into ache will not be applicable right here.
Seated sole-to-sole train: Sit together with your toes on the ground. Press the within edges of your toes collectively and maintain briefly, then launch.
Begin at 4 units of 25 reps day by day. Over 2 weeks, construct to 12 units of 25.
Then start combining units till you are able to do 300 steady reps with out stopping.
Theraband dorsiflexion (1x/day, 200 reps): Loop a theraband across the high of your foot and anchor it in entrance of you. Pull your toes up towards your shin in opposition to resistance.
Put a towel beneath your foot for smoother movement. Progress to a stronger band as soon as 200 reps feels simple.
Theraband inversion, endurance (1x/day, 200 reps): Anchor the band at 45 levels relative to your foot. Roll your foot inward (inversion) in opposition to resistance.
Towel beneath foot. Don’t rotate your leg.
All motion from the ankle.
Theraband eversion (1x/day, 200 reps): Identical setup as inversion however rolling the foot outward. Towel beneath foot, band at 45 levels.
Theraband inversion, power (2x/day, 3 units of 15): Identical inversion motion, however with the heaviest theraband you possibly can tolerate for 15 managed reps.
Accomplished twice day by day. Carry out slowly in each instructions.
Improve resistance over time.
Section 2: Purposeful Loading (Week 4+)
Add these when you’ve accomplished at the least 3 weeks of Section 1 with out ache. All are carried out as soon as day by day, in sneakers and orthotics.
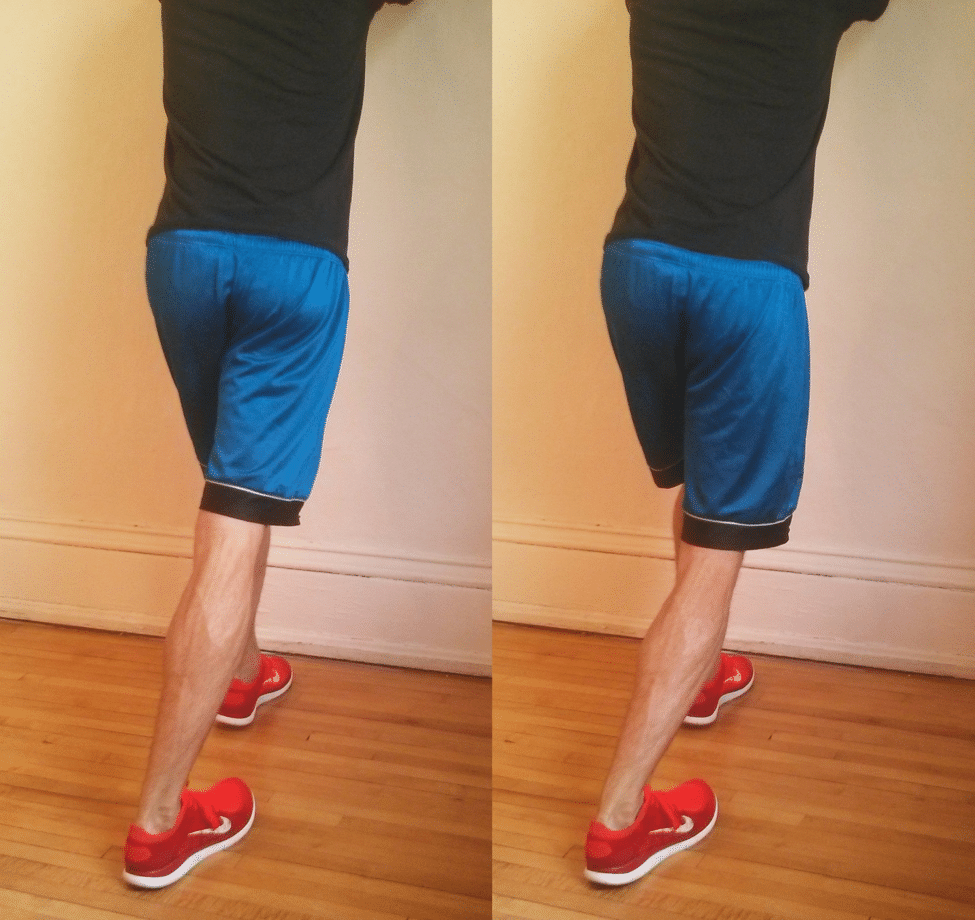
Single-leg heel raises: Stand on the affected leg, stand up onto your forefoot, decrease slowly. Begin with just some reps and construct progressively to 50 steady reps.
Use a wall flippantly for steadiness, not for assist.
Toe strolling: Stroll ahead in your toes with heels totally off the bottom. Begin at 8-10 yards and construct over time to 100 steady yards.
Stability board tapping: Stand in your affected leg on a steadiness board. Faucet the board to the bottom in a single route, return to balanced place.
Repeat 20 occasions in every of 5 instructions (ahead, again, left diagonal, proper diagonal, rotational). Then repeat the total sequence in reverse for a complete of two units of 20 in every route.
Plan on 3 months of day by day work throughout each phases.
Alvarez et al.’s full program ran 16 weeks, together with an preliminary 2-week relaxation interval. Kulig et al.’s protocols ran 10-12 weeks.
What Different Therapies Assist Posterior Tibial Tendonitis?
Icing: Ice commonly, particularly after rehab workout routines. A standard protocol is 10 minutes of ice therapeutic massage with an ice cup, 10 minutes of relaxation, then one other 10 minutes.
You possibly can ice as usually as each 2 hours.
Foam rolling your calves: Loosening your calf tissue reduces the stress transmitted to the posterior tibial tendon. Foam rolling is a helpful day by day addition alongside the stretching protocol.
Bodily remedy: In case you’re not enhancing after 6-8 weeks of constant conservative therapy, a PT who works with runners can assess whether or not extra power or flexibility deficits are contributing to the dysfunction.
Surgical procedure: If months of conservative therapy haven’t helped, seek the advice of with a podiatrist or foot and ankle orthopedist who focuses on runners. There are a lot of surgical choices, and outcomes range significantly by method and supplier expertise.
Conservative vs. Aggressive Remedy: What Ought to You Strive First?
Conservative (begin right here):
- Put on supportive sneakers and orthotics at the least 90% of waking hours, together with at dwelling
- Calf stretching: 3×30 seconds, straight and bent knee, each legs, twice day by day
- Section 1 theraband program: sole-to-sole, dorsiflexion, inversion (endurance + power), eversion, day by day for at the least 3 weeks
- Section 2 practical program: single-leg heel raises (construct to 50), toe strolling (construct to 100 yards), steadiness board tapping, as soon as day by day after 3 weeks of Section 1
- Ice after workout routines, as much as each 2 hours as wanted
Aggressive (when conservative isn’t sufficient):
- Customized orthotics from a podiatrist or foot/ankle orthopedist
- Bodily remedy for a customized program and hands-on therapy
- Surgical session if Stage II or past, or if conservative therapy has failed after a number of months
What Cross-Coaching Can You Do With Posterior Tibial Tendonitis?
You don’t must lose health whilst you recuperate.
Aqua jogging is the best choice for this damage. It intently mimics operating mechanics with zero influence on the posterior tibial tendon.
Analysis has discovered that runners who skilled solely with deep water operating for 4-6 weeks confirmed no measurable decline in 5k efficiency, VO2 max, lactate threshold, or physique composition in comparison with runners who continued overland coaching.
Biking and swimming are cheap options if aqua jogging isn’t accessible.
The important thing rule: no matter you select ought to be utterly pain-free. Any cross-training exercise that hundreds the posterior tibial tendon straight wants to return off the record.
For extra on construction your cross-training and which choices work greatest for various damage varieties, see our information on the most effective cross-training for injured runners.
When Can You Return to Operating After Posterior Tibial Tendonitis?
No printed analysis presents a selected return-to-running timeline for posterior tibial tendon dysfunction.
What the analysis does inform you is that this tendon tends towards everlasting harm if you happen to rush it.
Solely try a return to operating after you possibly can full 50 single-leg heel raises with out ache.
Begin with very quick, simple runs solely. If any ache returns throughout or after a run, again off instantly.
Construct up over a number of weeks earlier than including any tempo or quantity.
A bodily therapist with distance operating expertise might help you construct an individualized return-to-run plan, particularly helpful if you happen to’ve had an extended or extra sophisticated restoration.