
Your working shoe has a seventh eyelet on the high that almost all runners ignore.
That further gap is there for one cause: heel lock lacing.
Used accurately, the heel lock (typically referred to as the runner’s knot or ankle lock) pulls your heel deeper into the shoe, reduces the quantity your foot slides on impression, and lowers the load forces that contribute to emphasize accidents.
Three biomechanics research have examined it instantly. All three attain the identical conclusion: it really works, and it adjustments how a shoe feels in your foot throughout the first mile.
Right here’s what you’ll study:
- What heel lock lacing truly is and why that high eyelet exists
- What the analysis discovered when runners examined it in opposition to customary lacing
- Step-by-step directions for tying the heel lock knot
- When to make use of the skip-sixth-eyelet variant as a substitute
- Whether or not ladder lacing is value making an attempt
What Is Heel Lock Lacing?
Heel lock lacing is a lacing approach that makes use of the uppermost eyelet of a working shoe to create a loop on all sides, then ties these loops collectively to lock the heel in opposition to the shoe’s collar.
Customary cross-lacing pulls the shoe cosy throughout the highest of the foot, however the heel can nonetheless shift barely with every stride.
The heel lock eliminates that shift by anchoring the ankle throughout the shoe earlier than the knot is tied.
You’ll see it referred to as by a number of names relying on the place you look: runner’s knot, ankle lock lacing, and lock lacing all describe the identical approach utilizing the highest seventh eyelet.
A 2009 research testing 20 runners throughout 6 lacing circumstances discovered that 7-eyelet heel lock lacing produced the bottom peak heel pressures of any situation examined and considerably decreased tibial loading charges in comparison with customary six-eyelet cross-lacing, with no distinction in perceived consolation.
That second half issues.
Runners typically assume the heel lock will really feel tighter or extra restrictive than customary lacing.
The biomechanics proof exhibits the notion of consolation is identical.
Does Heel Lock Lacing Really Work?
Biomechanics researcher Marco Hagen on the College of Duisburg-Essen spent a number of years testing precisely this query.
In his first research, 20 skilled rearfoot runners ran via 6 totally different lacing circumstances whereas researchers measured impression loading charges, pronation velocity, and plantar strain distribution below the foot.
The 7-eyelet heel lock produced the bottom peak pressures below the heel and lateral midfoot of any lacing situation examined.
Hagen’s follow-up research added a second measurement: strain on the highest of the foot.
Tightening customary laces to get the identical stability because the heel lock elevated strain over the navicular bone and extensor tendons, constructions that may develop overuse accidents from extended strain.
The heel lock matched the steadiness of tight customary lacing with out elevating that dorsal strain.
A 2025 research from the College of Valencia added a thermal angle to the information.
A 2025 research in Utilized Ergonomics discovered that cross-lacing produced greater post-run foot pores and skin temperature than heel lock lacing, and that elevated temperature was instantly related to discomfort throughout working.
Cross-lacing holds warmth in a different way in opposition to the highest of the foot.
Heel lock lacing allowed for higher thermoregulation.
Runners within the heel lock situation reported greater consolation scores throughout the 20-minute treadmill trial.
Heel lock lacing reduces impression load on the decrease leg, improves heel stability, and leaves the foot cooler and extra snug throughout longer runs.
You possibly can learn extra about how foot strike sample interacts with impression forces if you need the broader biomechanics image.
How Do You Tie the Heel Lock Knot?
You want a shoe with a seventh eyelet on the high: the small loop gap barely above and offset from the principle eyelet column.
In case your shoe has 6 eyelets per aspect however no seventh, customary cross-lacing with a agency knot is the best choice.
For footwear with a seventh eyelet, comply with these steps:
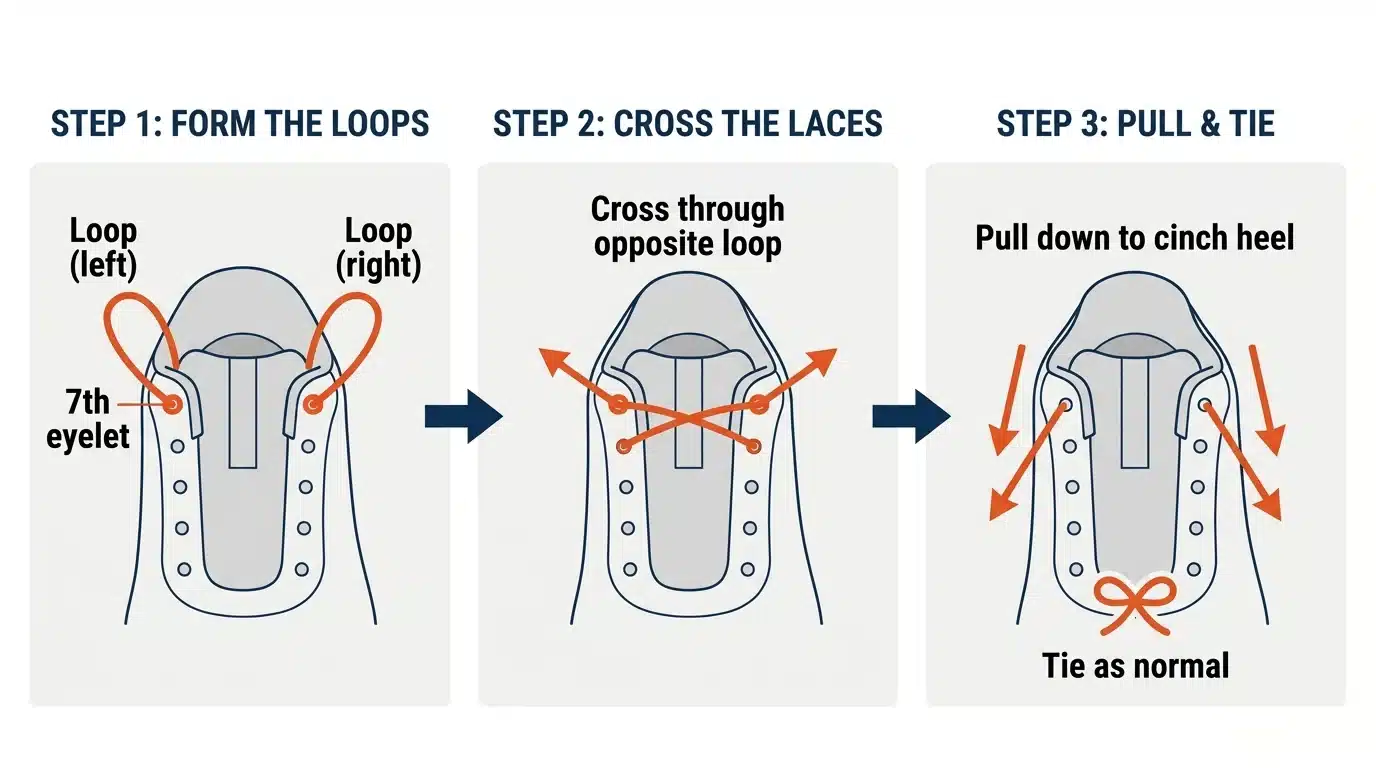
- Lace via the underside six eyelets usually. Use your customary cross-lacing sample up via the sixth eyelet on all sides.
- Thread the lace up into the seventh eyelet on the identical aspect. Don’t cross to the alternative aspect but. Pull the lace via so it kinds a small loop on the skin of the shoe.
- Repeat on the opposite aspect. You now have a loop on all sides of the shoe at ankle peak.
- Cross the laces via the alternative loop. Thread the left lace via the correct loop. Thread the correct lace via the left loop.
- Pull each laces down and outward to tighten. This cinches the heel collar in opposition to your ankle. You must really feel the heel seat firmly in opposition to the again of the shoe.
- Tie your customary knot as typical. The heel lock holds independently of the knot.
Pull the loops cosy however not tight sufficient to really feel strain in your ankle bones. The objective is to eradicate heel slip, to not prohibit blood circulate.
The primary time you attempt the heel lock, it might really feel unfamiliar across the ankle for the primary couple of minutes of a run.
That feeling fades shortly. What you acquire is a shoe that now not shifts on the heel throughout push-off.
Ought to You Skip the sixth Eyelet?
Hagen’s 2010 research examined a modified heel lock variant: skip the sixth eyelet solely, thread instantly from the fifth into the seventh to kind the loop.
That small change produced a measurable discount in strain over the talus and navicular bone.
The talus and navicular are the high-arch bones on the high of the foot simply above the tongue.
The 2010 follow-up research discovered that the skip-sixth-eyelet variant decreased peak dorsal strain over the navicular and tarsus greater than every other lacing sample examined, whereas sustaining the identical heel stability as customary 7-eyelet lacing.
In the event you expertise any of the next, the skip-sixth variant is value making an attempt:
- Ache or discomfort throughout the highest of the foot throughout longer runs
- Numbness over the midfoot, particularly when lacing feels tight
- A distinguished navicular bone or excessive instep that presses in opposition to the shoe tongue
- A historical past of extensor tendonitis
The approach is similar to the usual heel lock. Skip the sixth eyelet and go on to the seventh when forming the loop on all sides.
For runners with out dorsal strain points, the usual 7-eyelet heel lock and the skip-sixth variant carry out equally nicely on stability.
When Does Ladder Lacing Make Sense?
Ladder lacing (additionally referred to as Lydiard lacing, after coach Arthur Lydiard who promoted it within the Sixties and 70s) routes the laces in parallel horizontal rungs moderately than crossing diagonally excessive of the foot.
The laces by no means cross the metatarsals, which removes the diagonal strain level that customary cross-lacing creates throughout the midfoot.
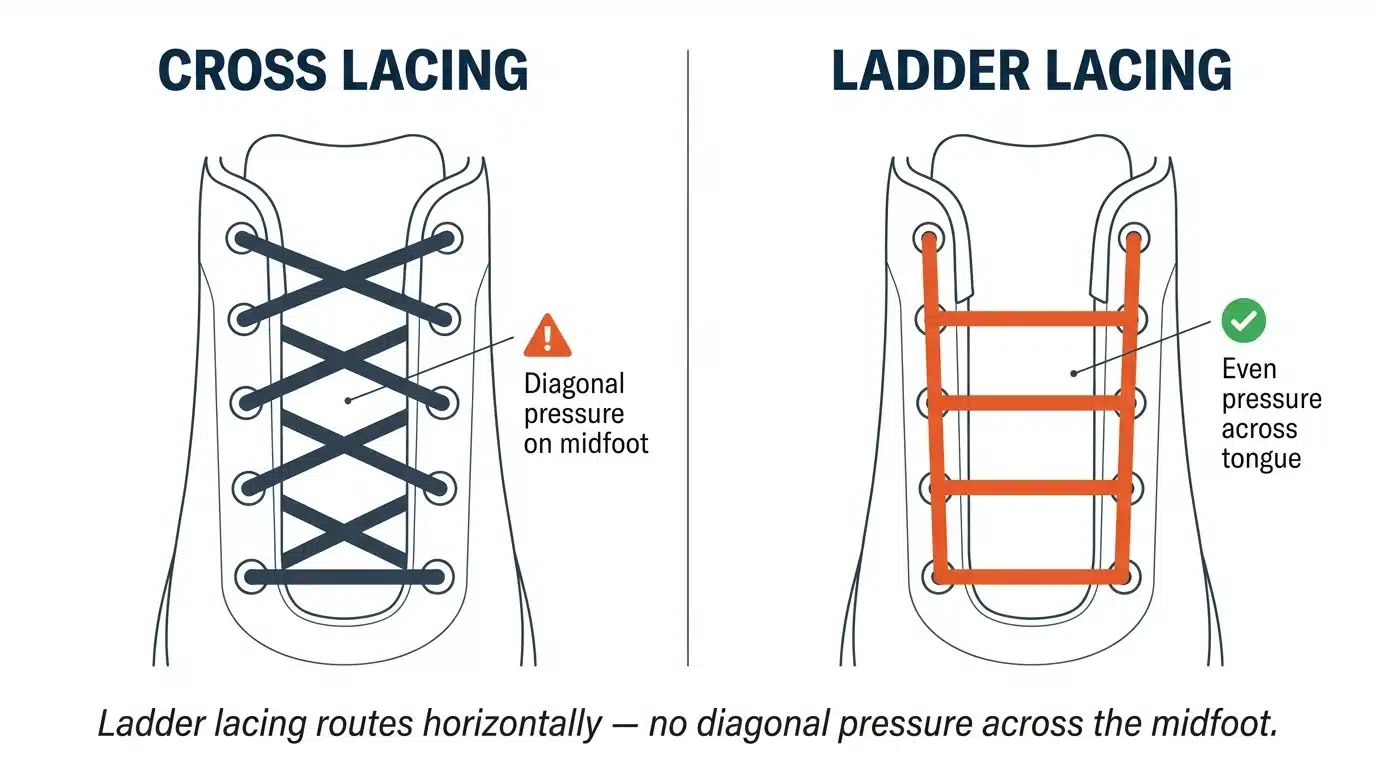
There may be restricted biomechanics analysis on ladder lacing particularly. Hagen famous this hole in his personal papers.
Based mostly on the mechanism, ladder lacing is value making an attempt if:
- You’ve got recurring ache or blisters on the highest of the midfoot that aren’t resolved by the skip-sixth variant
- You’ve got huge toes the place the diagonal lace strain is concentrated over a broad space
- You want most strain distribution throughout the tongue moderately than a stability focus
Ladder lacing trades some heel stability for top-of-foot strain reduction.
Runners who want each can pair a ladder base with a heel lock end: use ladder lacing from the toe up via the fifth or sixth eyelet, then transition to heel lock loops on the seventh.
Which Lacing Sample Ought to You Use?
The reply will depend on what downside you’re fixing.
| If in case you have this downside | Do this lacing |
|---|---|
| Heel slipping throughout push-off | Customary heel lock (7-eyelet) |
| Ache on high of foot from tight lacing | Skip-sixth-eyelet heel lock |
| Numbness or strain throughout the midfoot | Ladder lacing (or skip-sixth) |
| Black toenails or toe field strain | Skip first or second eyelet; widen toe field |
| No particular downside | Customary heel lock (analysis helps it as a default) |
RunnersConnect Bonus
Obtain your FREE lacing strategies information.
You understand how to learn the wear and tear of footwear, however are you lacing your footwear incorrect? Obtain our Working Shoe Lacing information without cost and get a fast reminder, particular how-to and assets for movies on the easiest way to lace your trainers.
The analysis makes the clearest case for the usual heel lock as a default for many runners.
It reduces impression load, stabilizes the heel, and doesn’t require any discomfort tradeoff to do it.
The shoe lacing you employ impacts each stride you tackle a run.
Spending two further minutes tying the heel lock knot earlier than a coaching cycle prices nothing and removes one variable that drives repetitive stress accidents over time.
Your arch peak and foot kind additionally have an effect on how your shoe matches and performs. In the event you’re coping with recurring ache that lacing adjustments don’t totally resolve, arch peak and foot kind is value studying subsequent.